Appearance
Campuses
Provisioning a Neo Campus (multitenancy)
These are Neo campuses which are tenants under the delta_lms repository multitenancy setup.
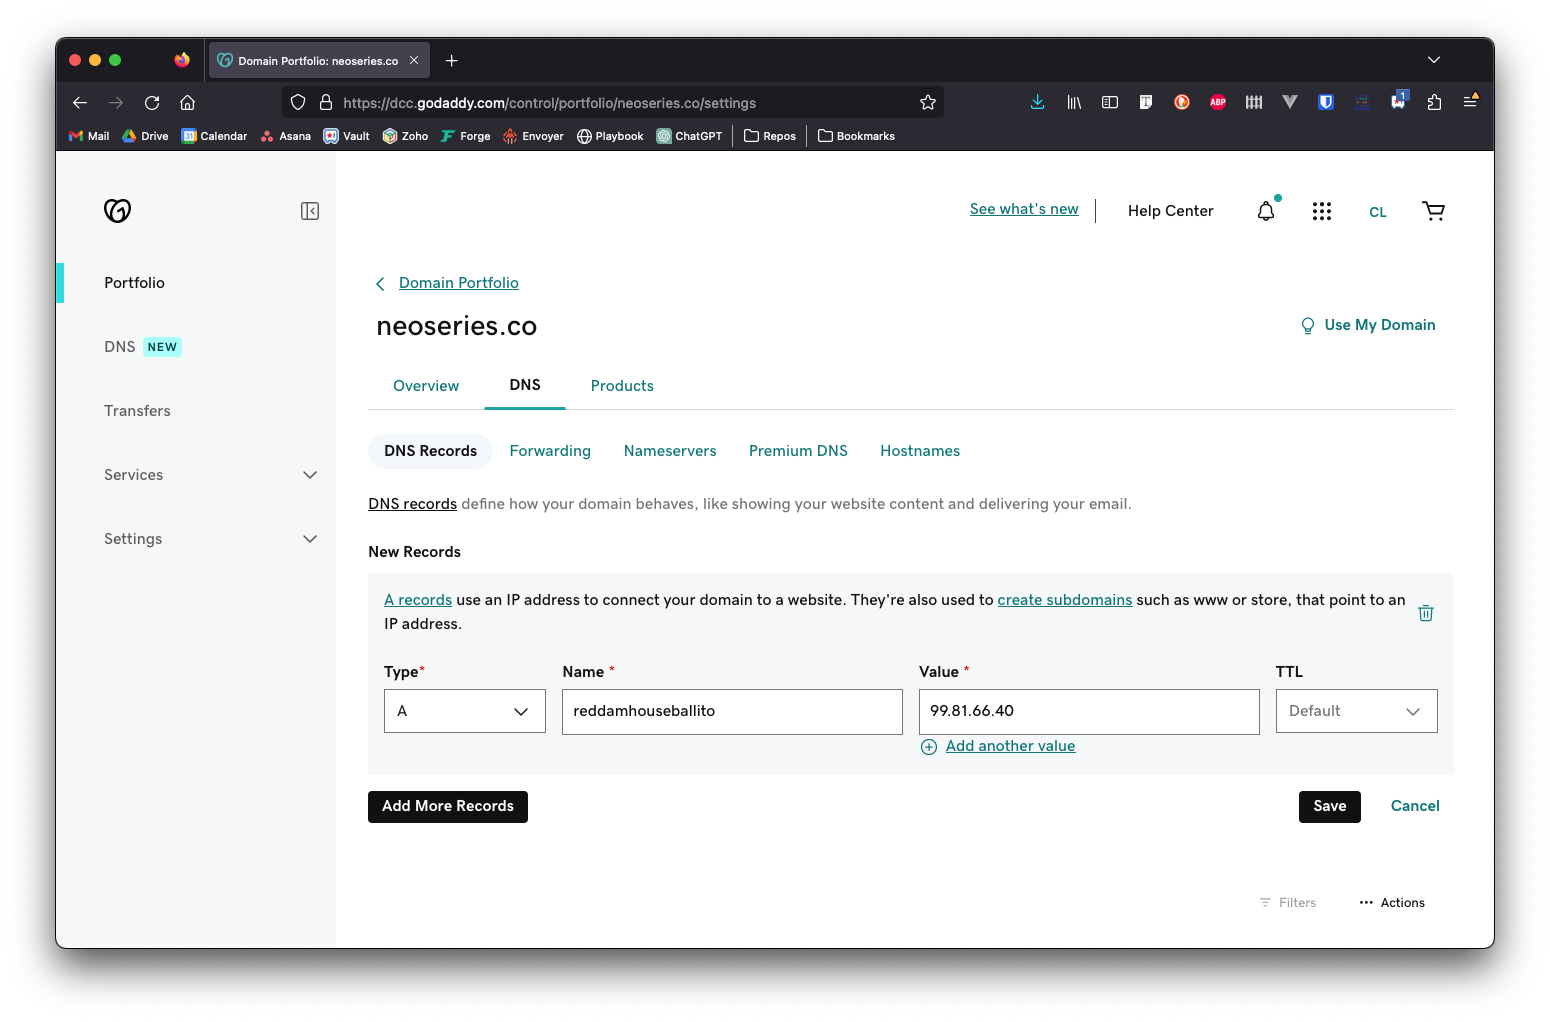
Create the DNS A record for the new subdomain in GoDaddy
- Visit GoDaddy
- Navigate to the DNS records area for the neoseries.co domain
- Add a new A record which points the new subdomain to the IP address of the
campusesserver in Forge - Click
Savebutton
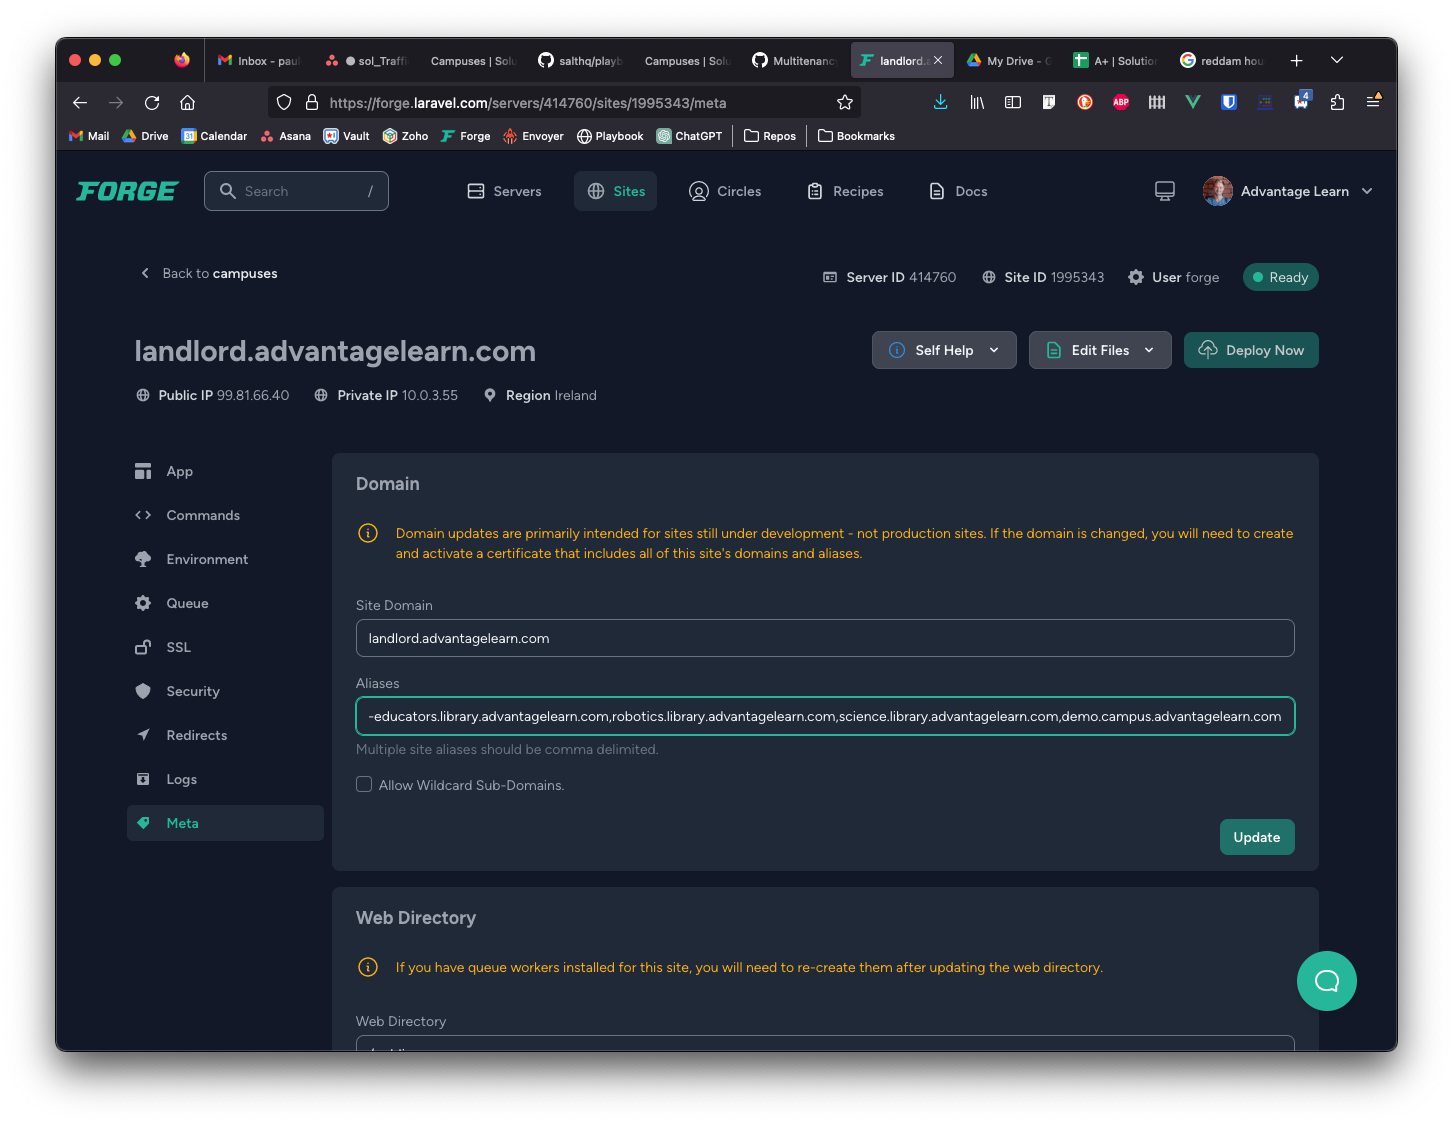
Create site alias to landlord in Forge
- Visit Forge
- Select the
campusesserver - Select the
landlord.advantagelearn.comsite - Select the
Settingstab in the menu sidebar on the left - Add the domain of the new campus to the end of the
Aliasesfield - Click
Updatebutton
Re-issue SSL certificate for all the tenant sites
- While still in the
landlord.advantagelearn.comsite area of Forge - Select the
SSLtab in the menu sidebar on the left - Click the
Lets Encryptbutton in the New Certificate area - Click the
Obtain Certificatebutton - Check that the new alias domain is listed in the
Domainsfield, if not wait a few minutes and try again - NOTE: For now (until we can implement a wildcard certificate) you will need to remove the www.neoseries.co alias from the
Domainsfield - Keep all other settings per defaults, and click
Obtain Certificatebutton - Wait for the new certificate to install, if it fails to install it is likely you made an error with the new DNS A record or it hasn't propagated yet
- Once the new certificate is installed, click the
Activatebutton for the new certificate - If the new certificate successfully activates, and if desired, you can remove any previous certificates
Create a new tenant in the landlord site
- Visit landlord.advantagelearn.com/admin
- Ensure you have super-admin privileges (speak to one of the senior devs if not)
- Click the
Tenantslink in the sidebar menu - Click the
Add newbutton in top right - Complete all the fields in the
Tenant detailssection, refer to one of the existing tenants as needed - Although the fields still exist (temporary until we remove them) you don't need to input any DB-related details, just put dummy text in for now
- Click the
Savebutton
Create a new application in the Auth App
- Visit auth.advantagelearn.com
- Click the
Applicationslink in the sidebar menu - Click the
Add newbutton in top right - Complete all the fields in the
Application detailssection, refer to one of the existing applications as needed - Click the
Savebutton
Redeploy the landlord site
- Visit Envoyer
- Re-deploy to the
landlord.advantagelearn.comsite - This will cause the database migrations and seeders to run on the new tenant database
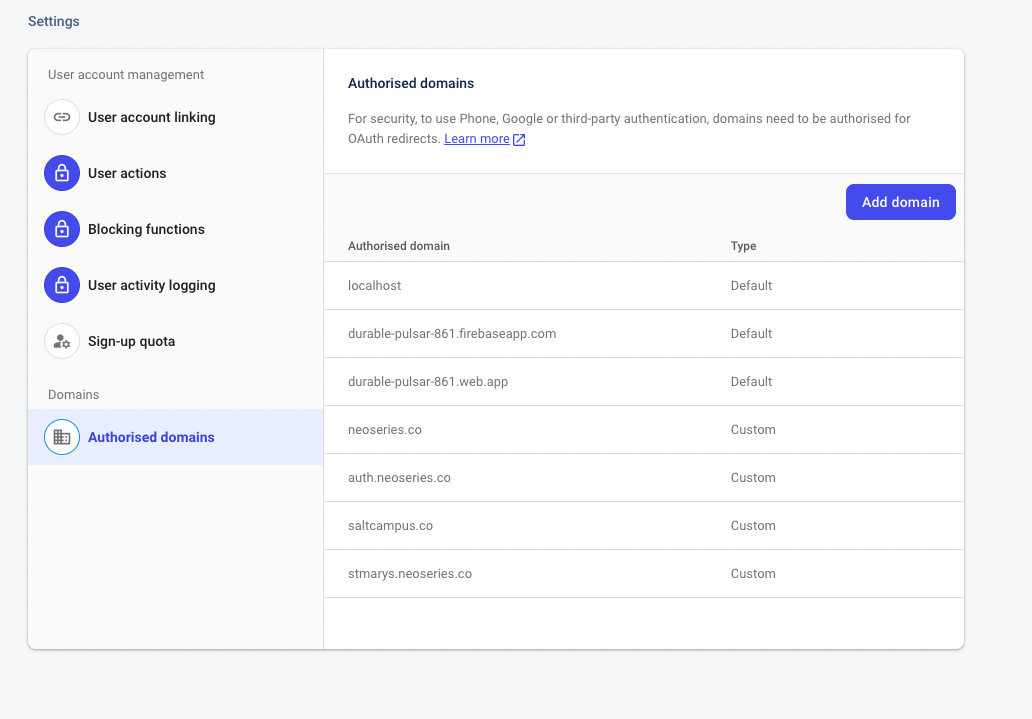
Whitelist the new campus in Firebase
- Visit the Firebase console and navigate to the 'Advantage Learn' project
- Select the
Authenticationmenu link - Select the
Settingstab - Select the
Authorized domainssection link - Add the domain of the new campus (eg: stmarys.neoseries.co)
Add the new campus to the Campus Shuttle app
- Add a
.mdfile for the new campus in the/content/campusesdirectory of the Campus Shuttle repository - Bump the version number in
static/version.jsonso that the cache is busted on the clients' browsers - The Netlify app will automatically re-deploy once a new commit is made to the
mainbranch
Add the new campus to the SOL App Tracker spreadsheet
- Add a new entry to the App Tracker Sheet
- Make sure to include all relevant app details per the supplied columns of the sheet
Temporary things to check while we iron out the kinks of the new multitenancy provision process
- In the DB of the landlord site, check that the
salt_auth_urlentry for the new tenant (check against tenant_id) in thesettingstable points to the correct auth app (likelyauth.advantagelearn.com)
Provisioning a Salt Campus (non-multitenancy)
These are standard (non-multitenant) campuses using the salt_campus repository.
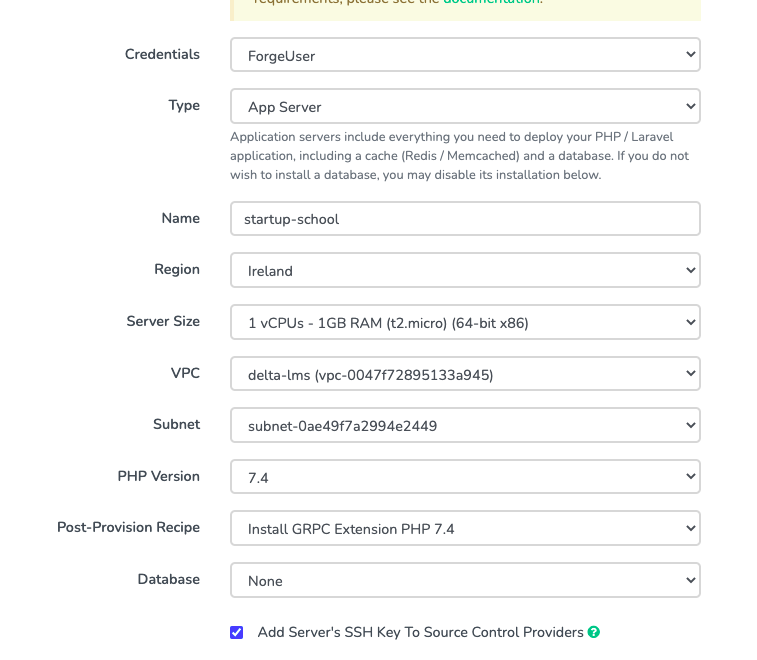
Forge set-up
Only required if you are creating a new AWS server. If you are creating a campus we can use the global campus server already provisioned.
- Set up the Server on AWS via Forge
- Make sure Subnet is in the same subnet as the DB
- We don't create a DB on the Forge
- We create the DB directly on AWS (for RDS)
- Add the GRPC post-provision recipe
Domain provisioning
After Forge provisioning you can start to set up the domain
- Log into AWS to set up elastic IP
- Under EC2 in AWS console
- Make sure your region is set to Ireland, then click 'Instances' under the "Resources" section
- Allocate an Elastic IP to the new instance
- This will mean the assign IP will change to the elastic in AWS
- Go to Forge console, select the server you are provisioning, go to 'meta' and change the IP address to the new elastic IP address
- You can now use the EIP to set up the domain
- Assign A records for the domains to the EIP
Forge server/site provisioning
Now we need to set up the sites on Forge
- For each server we need a scheduler running
- Add command, keep the frequency at 'every minute' and hit start. Replace "demo.campus.advantagelearn.com" with the name of the domain you are setting up
jsxphp7.4 /var/www/demo.campus.advantagelearn.com/current/artisan schedule:run - For each server we need a daemon for horizon
- Add in command. Replace "demo.campus.advantagelearn.com" with the name of the domain you are setting up
jsxphp7.4 artisan horizon var/www/demo.campus.advantagelearn.com/current- Save
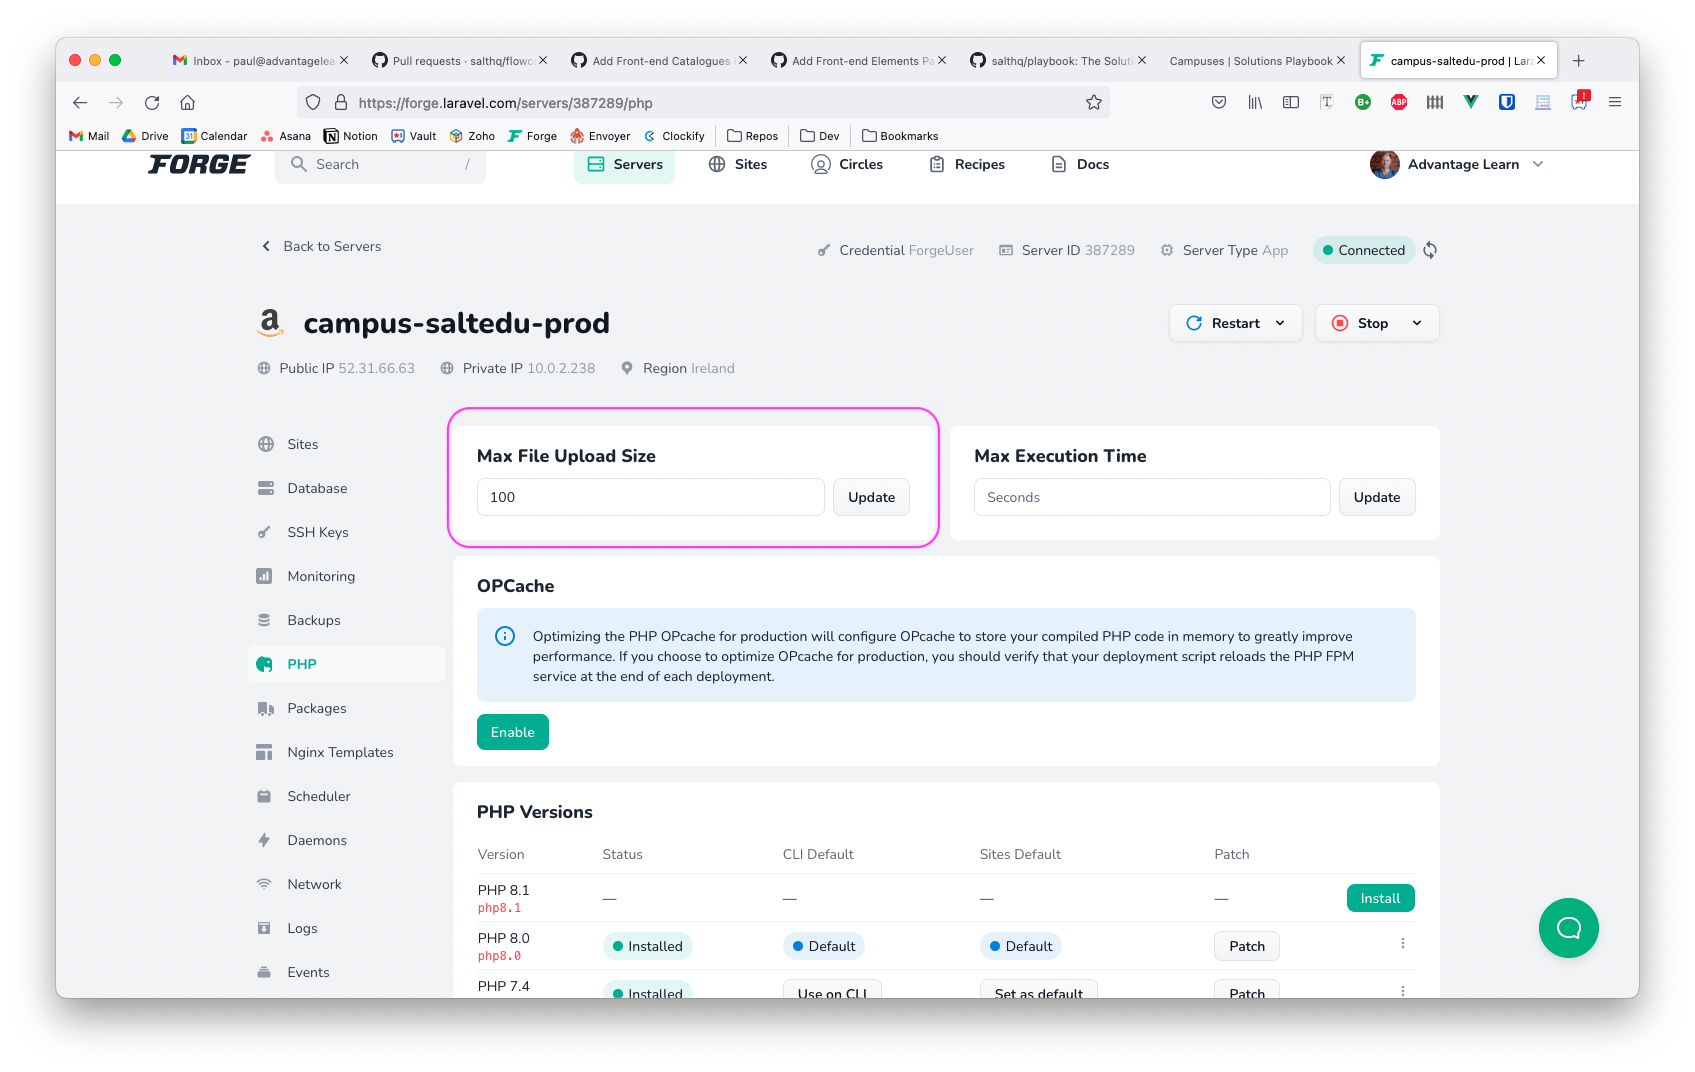
- Set the PHP max file upload size at the server level
- This is a more efficient way than manually setting it at the site level, but the site level can be set if needed
- If you don't set this limit it will be at the low default of 2MB
- Go to the PHP settings for the server in Forge
- Input a value in the Max File Upload Size field, this will be in MB
- Click Update button
Create the site
- We don't need to set up the repository (we handle this in Envoyer)
- Choose a domain name
- Make sure the project type is the default (General PHP/Laravel)
- Keep the rest of the settings as is
- Click 'add site'
- Don't pick one of the auto-installation options that appear after creating the site - we handle deploys in envoyer
Edit the Nginx config for the site
- If you have the site selected in Forge, click on 'Files' at the bottom of the screen and select 'Edit Nginx configuration'
- Get the config to match the template below. Generally its just the first part of the server block that needs to be modified. Make sure it matches this (change the domain accordingly):
server { listen 443 ssl http2; listen [::]:443 ssl http2; server_name demo-a.salthq.co; server_tokens off; root /var/www/demo-a.salthq.co/current/public;- While you're there add the following lines to the end of the
location ~ \.php$codeblock:
fastcgi_connect_timeout 75; fastcgi_send_timeout 600; fastcgi_read_timeout 600; fastcgi_buffers 32 256k; fastcgi_buffer_size 512k;- You want that codeblock to look something like this:
location ~ \.php$ { fastcgi_split_path_info ^(.+\.php)(/.+)$; fastcgi_pass unix:/var/run/php/php8.0-fpm.sock; fastcgi_index index.php; include fastcgi_params; fastcgi_connect_timeout 75; fastcgi_send_timeout 600; fastcgi_read_timeout 600; fastcgi_buffers 32 256k; fastcgi_buffer_size 512k; }- Save
- Set up SSL for the site once the domain has been set up
- Select SSL from the menu on the left
- Select 'LetsEncrypt"
- Ensure the domain is correct, and click "Obtain Certificate"
DB hosting
DBs are provisioned in AWS
Most campus DBs will use a global campuses-prod RDS instance
- Connect to the RDS instance from your tool of choice, such as TablePlus, and add a new database using the naming convention of
domain_production, such asschoolname.neoseries.co_production
The following steps are only for creating a new RDS instance which won't be necessary for a typical campus provisioning
- Go to RDS section in AWS Console
- NB: All our instances are in Ireland (You need to select that region or you won't see anything)
- Create DB RDS instance
- Choose Standard Create
- Pick MySQL
- MySQL version: 8.0.20
- Add identifier
- eg: campus-demo-prod (this is once-off)
- Default username: admin
- Generate DB password: store in Bitwarden
- Pick 'burstable classes ' for DB instance class
- DB Instance size: t3.small
- Storage: General Purpose - 100GB
- NB: Select ' Do not create standby instances' (unless you want 3x more costs)
- Select the Delta LMS VPC
- Connectivity Additional config:
- Disable enhanced monitoring (You can turn this on if you are experiencing issues)
- Leave all other to default
Firebase set-up
Project setup - ignore if provisioning a Neo campus
- Go to console.firebase.google.com and select 'Add project'
- Pick a project name. Suggestion: same as RDS name for consistency. If an existing project has the same name, it will add a random suffix. Rather name it slightly differently in this case. E.g: "blue-eagle" is taken, so I've named it "blue-eagle-lms" instead
- Keep Google Analytics enabled
Cloud Firestore - ignore if provisioning a Neo campus
- Once the project has been created, click on 'Cloud Firestore' to set up the DB
- Click 'Create Database'
- Make sure 'Start in Production mode' is selected and click "Next"
- Choose eur3(europe-west) for the location and enable
- Once the database is set up, click on the 'rules' tab to set up read/write rules.
- Add in the following and save:
jsx
rules_version = '2';
service cloud.firestore {
  match /databases/{database}/documents {
    match /{document=**} {
      allow read, write: if request.auth != null;
    }
  }
}
Create Firebase app
- Click on the cog icon next to "Project Overview" and select "Project Settings"
- At the bottom of the General tab, there is a 'Your apps' section. Pick the web platform icon (looks like a div closing tag)
- Choose a nickname for the app, e.g "Blue Eagle LMS"
- Leave Firebase hosting unticked
- Click "Register app"
- You'll get a code snippet showing some of the configuration options. This is accessible from settings, so don't worry about it for now - press "Continue"
Firebase ENV variables
See Zoho Vault for Firebase .env variables.
Pusher set-up
Create the app
- Navigate to pusher.com and sign in (account details on bitwarden)
- Click "Manage" in the channels card
- Create a new app
- Name the app - try keep it the same as the RDS name
- Select "eu(EU (Ireland))" as the cluster
- Ignore the multiple environments check box and the tech stack - we've already got pusher set up in the code
- Click "Create app"
App Keys
- Click on "App Keys" from the menu on the left
- Keys were generated when you created the app, use these to fill out the relevant ENV variables
Pusher ENV variables
See Zoho Vault for Pusher .env variables.
Push Notifications set-up
See Zoho Vault for Push Notifications .env variables.
Webhooks set-up
See Zoho Vault for Webhooks .env variables.
S3 setup
Note: the steps below might change once we have a stricter privacy set up.
- Login to AWS and navigate to https://s3.console.aws.amazon.com/
- Click on "Create bucket"
- For the bucket name, try keep it similar to what's been used for the RDS name, eg "blue-eagle"
- Set the region to be EU (Ireland) eu-west-1
- Make sure "Block all public access" is unchecked
- Check the public acknowledgement box in the public access warning message
- Scroll down to the bottom of the page and click "Create bucket"
- Once the bucket is created, open it and go to the "Permissions" tab
- Scroll down to "Bucket policy" and click edit
- Paste in the following script and save, replacing BUCKET_NAME with the name of the bucket you've created:
jsx
{
    "Version": "2008-10-17",
    "Statement": [
        {
            "Sid": "AllowPublicRead",
            "Effect": "Allow",
            "Principal": {
                "AWS": "*"
            },
            "Action": "s3:GetObject",
            "Resource": "arn:aws:s3:::BUCKET_NAME/*"
        }
    ]
}
S3 ENV variables
See Zoho Vault for S3 .env variables.
Mandrill set-up
Mandrill will use a global API for all campuses, we do not need to set up a new set of keys unless it is under a new client eg: Startup School.
Auth0 set-up
Tenants
- Campus tenants
All sites will be applications in the advantage-learn tenant
Reason: https://auth0.com/docs/users/user-account-linking
- Client tenants
Some solutions require a separate tenant, eg: Startup School. These tenants can be created in the auth0 dashboard
Connections
Connections used to store the authentication credentials of a user, common connection types include:
- Database: login with username/email and password
- Social login: Google account, facebook account
In general we use a database connection. For each separate application we will need to create a database connection using the application key eg:
- DB-Campus-Demo-Prod
Users & Roles
We generally disallow signups through the Auth0 UI, which means you'll need to create an admin user manually in order to login. Your user will also need to be verified as either an 'admin' or 'super-admin' in the app to access the dashboard. In order for the app to verify this, you will need to create these role on Auth0 and assign it to your newly created user.
Create roles
- Click on "Users & Roles" from the menu
- Click on roles
- Click "Create role"
- Name the role "super-admin"
- Give it a description, such as "Users with all permissions granted" or something similar
Create users
- Click on "Users & Roles" from the menu
- Click on users
- Click "Create user"
- Add details and create
Assign role to users
- Click on "Users & Roles" from the menu
- Click on users
- Search for the user using email address or name
- Click on the user once found
- Click on the 'roles' tab
- Click 'assign role'
- Search for the role in the dropdown menu and click save
Applications
Each instance should have it's own Application:
- Add application name
- Choose 'Regular Web Application'
- Choose 'PHP (laravel)'
The following need to be set up in an application (replace "campus/advantagelearn.com" with the name of the domain you are provisioning):
Callback url
- Laravel: https://campus.advantagelearn.com/auth0/callback
- WordPress: https://advantagelearn.com/index.php?auth0=1
Allowed Logout URLs
Allowed Web Origins
Connections
- Link the relevant connections
Auth0 ENV variables
See Zoho Vault for Auth0 .env variables.
Auth0 Management API
Through the Auth0 management API we can:
- Create connection: https://auth0.com/docs/api/management/v2#!/Connections/post_connections
- Create application: https://auth0.com/docs/api/management/v2#!/Clients/post_clients
Envoyer set-up
Create the project
- Create a new project for each instance
- Add repository. Default settings:
- Repo: salthq/delta_lms
- Branch: master
- Once created, click on the project name from the projects dashboard, then select 'Settings' in the top right corner
- From "The Basics", add a health check URL. This is the domain used to check if the app is accessible from multiple locations. Generally set it to the root domain URL, e.g "https://campus-app.com"
- Click on "Source Control"
- Make sure "Install composer Dependencies" as well as "Install 'Dev' Composer Dependencies" are checked
- Add health check URL
- This is the domain used that will check if it's accessible from multiple locations
Set up the server
- Click on the "Servers" tab of the project and click the "Add Server" button.
- Add a name for your server, generally we use the project name, in lower case with no whitespace
- Add the IP address for the app you are setting up. You can find this on Forge or EC2
- Set the port to be 22
- Set "Connect As" to be "forge"
- Keep the standard PHP version
- Check the "Receives Code Deployments" box
- Set the project path to be
/var/www/campus-app.com. Replace "campus-app.com" with the domain name of the project you are setting up - Click "Save Server"
Enable SSH access and file/folder permissions
On forge.laravel.com, add your SSH keys so you can SSH into server
You get the Sudo password from the Zoho Vault record
In server create the directories
jsx
sudo mkdir /var/www/{domain_name}
sudo mkdir /var/www/{domain_name}/releases
sudo mkdir /var/www/{domain_name}/storage
sudo mkdir /var/www/{domain_name}/storage/framework
sudo mkdir /var/www/{domain_name}/storage/framework/cache
sudo mkdir /var/www/{domain_name}/storage/framework/views
sudo mkdir /var/www/{domain_name}/storage/framework/sessions
jsx
sudo chown -R forge:forge /var/www/{domain_name}
sudo chmod -R 775 /var/www/{domain_name}
Set up the ENV file
Once the server has been created on Envoyer, you'll need to add all the ENV variables required to run the app. Read through the ENV variables document for assistance with this:
NB Ensure that the Laravel Application Name Differs from any pre-existing application names on the server to ensure no Horizon/Redis/Queue Conflicts Arise
# Practically that may then look like App Names
* PetroConnect Hub
* PetroConnect Hub Dev
OR
* Campus Maths Library
* Campus Science Library
See Zoho Vault for Envoyer .env variables.
Set up deployment hooks
- Click on "Deployment Hooks"
- Click on "Copy Hooks"
- If this is a production server, copy from Campus-Advantage-Production. Otherwise pick the appropriate server: dev, or staging.
- Click on the button with the spanner icon next to each hook, double check that is correct and check the 'On servers' checkbox for each one.
- NB! Make sure deployment hook is created for
php artisan storage:linkcommand which needs to run on each deployment - this is a new need since moving off the old campus crate (Copy all deployment hooks from St Mary’s campus which has this)
Notifications
- Click on "Notifications"
- Click on "Add channel"
- Add a name and choose "slack" as the type
Check that Horizon is active on the new campus
- Visit
/horizon(e.g. https://langieshigh.neoseries.co/horizon) to see the status - If it's inactive then restart the daemon in the Forge admin area for that campus
Add the new campus to the App Tracker sheet
- Add a new entry to the App Tracker Sheet
- Make sure to include all relevant app details per the supplied columns of the sheet
Add an HTTP monitor to Uptime Robot
- Log in to Uptime Robot, credentials in Vault
- Click
Add new Monitorbutton in top left of dashboard - Add an HTTPs monitor with the /login URL of the campus, i.e. https://rbi.neoseries.co/login
- Select the A+ Slack as alert contact
- Keep all other settings as default and click Save Changes
Set up automatic icon generation
When a favicon is added via the settings page, npm run generate-icons is run behind the scenes to generate all the icons necessary to allow the app to be a PWA.
There are some dependencies which need to be installed on the server in order for this to work.
Install chromium-browser
- SSH into the server
- Run the following command
jsx
sudo apt install chromium-browserInstall puppeteer dependencies
The pwa-asset-generator package uses puppeteer behind the scenes. This has some dependencies which need to be installed. A lot of these will already be there, but by running the script below on the server you'll get whichever dependencies are not installed. See the links below for more info
jsx
sudo apt install ca-certificates fonts-liberation libappindicator3-1 libasound2 libatk-bridge2.0-0 libatk1.0-0 libc6 libcairo2 libcups2 libdbus-1-3 libexpat1 libfontconfig1 libgbm1 libgcc1 libglib2.0-0 libgtk-3-0 libnspr4 libnss3 libpango-1.0-0 libpangocairo-1.0-0 libstdc++6 libx11-6 libx11-xcb1 libxcb1 libxcomposite1 libxcursor1 libxdamage1 libxext6 libxfixes3 libxi6 libxrandr2 libxrender1 libxss1 libxtst6 lsb-release wget xdg-utilshttps://github.com/onderceylan/pwa-asset-generator
https://github.com/puppeteer/puppeteer/blob/main/docs/troubleshooting.md
Campus Firebase Authentication Activation
Changing An Existing Campus' Domain
- Add new domain DNS A record in domain host (e.g. GoDaddy)
- Update Forge settings to include new URL as alias
- Create and activate new SSL certificate so alias is included
- Update Neo auth app settings to include new URL/s
- Update the APP-URL in Envoyer .env
- Update the Health Check URL in Envoyer
- Update URL on Campus Shuttle app
- Update URL on App Tracker sheet
- Update UptimeRobot monitors
- Add new subdomain forward in domain host DNS settings (e.g. GoDaddy)
Decommissioning a Neo Campus (Multitenancy)
- Remove from Uptime Robot
- Remove from Campus Shuttle
- Updates on Forge
- Remove domain from aliases
- Generate new SSL certificate with this domain removed
- Remove app on Firebase
- Remove DNS A record/s (from GoDaddy or Cloudflare)
- Remove from Auth App
- Remove tenant from landlord
- Remove campus from App Tracker sheet and add same campus to Decommissioned Campuses sheet
Decommissioning a Salt Campus
Safe to remove
- Remove from Uptime Robot
- Delete on Envoyer
- Delete on Forge
- Delete site
- Remove schedulers
- Remove daemons
- Remove app on Firebase
- Remove DNS A record/s
- Remove from Auth App (or Auth0 if legacy)
- Remove campus from App Tracker sheet and add same campus to Decommissioned Campuses sheet
DANGER ZONE!!! (End-user data-loss could result so only proceed with these steps after confirming with CTO)
- Remove AWS S3 bucket
- Remove SQL database from AWS RDS
- Remove app files and folders stored on Forge server (typically in
/var/www/{domain_name})